Originally posted on Hackster January 28, 2019
As impressive as they are, Roombas still manage to get stuck under things and you’d think for what they cost this wouldn’t be an issue. Both my mother and grandmother have this problem and in my opinion they shouldn’t have to be crawling under beds to drag this robot out. Sure they sell cheap IR remotes that sometimes work if you hold them at a special angle, but the Roomba was designed to be automated. So with that, let’s hack a Roomba.
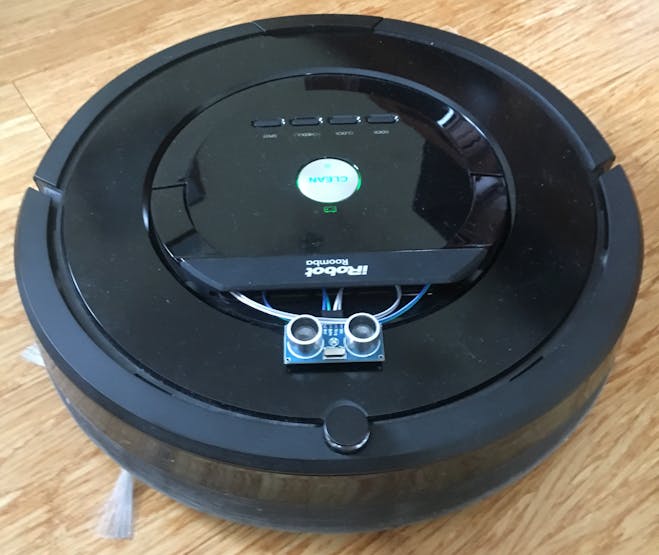
Goal: Add an additional sensor to the top of the Roomba to indicate when it is located beneath an object and write a program that prevents the robot from stopping in an unreachable area.
How to Hack
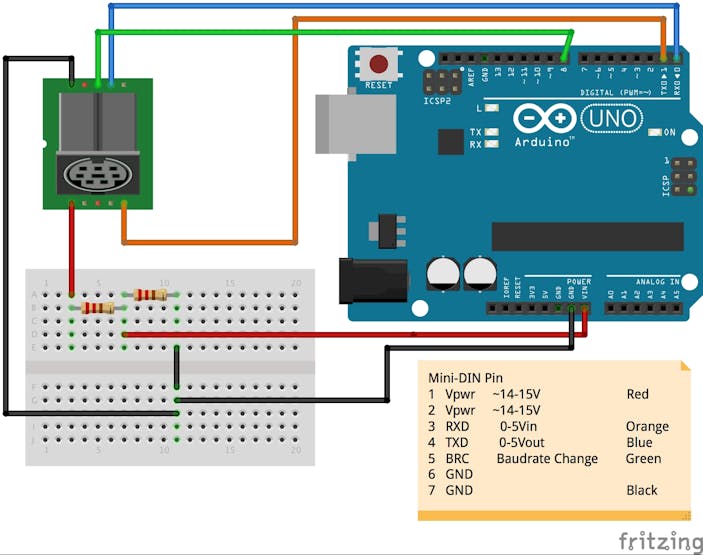
That sounds simple enough, just slap an ultrasonic on there and call it done. So first problem: how exactly do you actually hack into the Roomba and talk to it? Well there just so happens to be a mini-DIN Serial port on the top located under the handle.
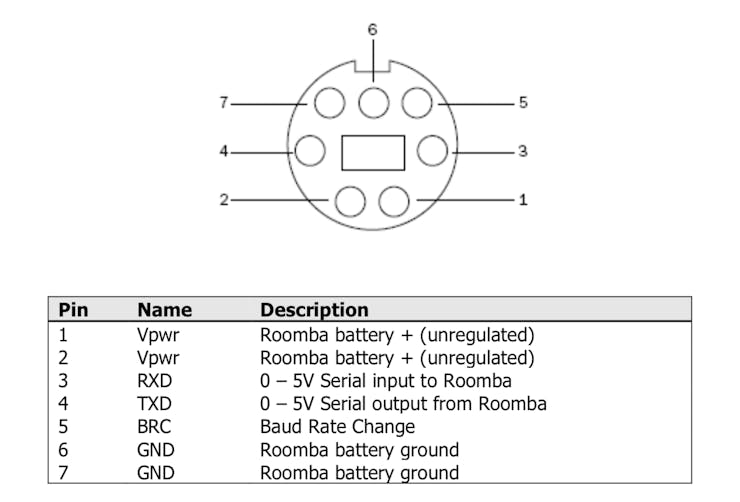
The convenient diagram above comes from a document released by iRobot (the company that makes Roomba) titled “iRobot® Create® 2 Open Interface (OI)“. The specs are based around a hackable version of the Roomba for STEM students, but fortunately enough for us, the interface remains primarily the same. Now that we have a port to talk to our robot through let’s connect it with some jumpers to an Arduino and start feeding it commands.
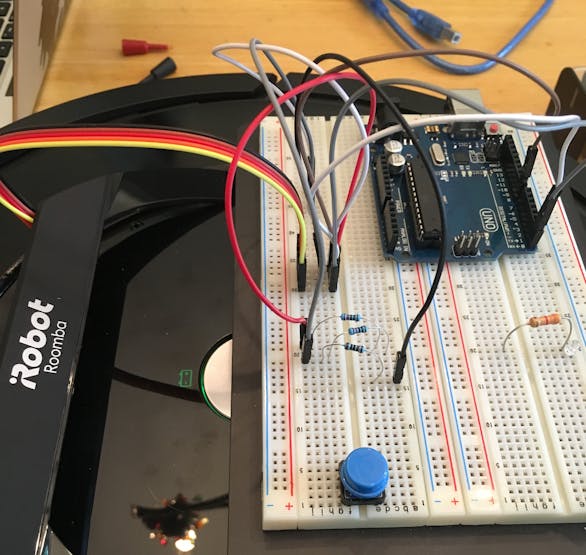
The first thing I did was send basic commands to the Roomba to see if I could get the response I was expecting. For this I told the Roomba to wake up and start cleaning (fair warning: if you are testing the function this way be ready to grab the robot before it takes off across your kitchen table). With that working we can now turn the Roomba on to its cleaning mode while it’s under furniture. Another thing that I did at this point was use the power from the mini-DIN to power my Arduino. Using a multimeter I found that I was getting ~14V coming off the Roomba which is higher than I want for my Arduino (and later will be way to much for the smaller Teensy LC). To remedy that I used a simple voltage divider with a few resistors to drop the voltage to be within the range I wanted.
The Sensor:
If you reviewed the parts list at the top of this project you’ve likely already noted that I’m using a pretty standard ultrasonic on this project. This wasn’t my first choice due to its size, I would have preferred to use a simple infrared but the issue with this is the working environment. Unless you have some mood lighting under your bed it’s generally pretty dark down there, my concern being that depending on the specific conditions it may be too dark for the IR sensor to work. I plan I running some tests on this later, but other than the method of collecting distance data, the logic we’ll be using to control the Roomba shouldn’t change.
I’m not going to go through the steps of how to go about collecting this data because there’s already plenty of tutorials out there and even example code that comes standard with Arduino software. I will be switching to the Teensy LC later on that operates at 3.3V and for that I have to regulate the voltage a little but fortunately that’s relatively simple too. Having that taken care of for the time being we can begin working on the logic we’re going to use and understanding how the Roomba thinks.
Programming Logic:
As great as it would be to simply tell the Roomba to “keep going” while under something, it’s not quite good enough. My primary concern going into this was that every time I sent a “start cleaning” command, the Roomba would essentially reset and forget how much of the room it had already covered. Regardless, this isn’t the best idea because should the Roomba stop under an object the “start cleaning” command will force it to clean the entire space again and hope that it doesn’t stop in the wrong place the second time around.
In my mind the best way to fix that is to keep track of what mode it is in. In this case instead of endlessly gathering distance data, we actually monitor data from the Roomba’s sensors to know when it’s moving and only read the distance data when we know the Roomba has stopped. With this information we can establish what mode it is in (standby or clean) and when it’s necessary to send a command that moves the Roomba. This also allows the Roomba to stop from doing another complete cycle of cleaning the space. In pseudo code logic it looks something like this:
loop {
    case 1: # When Roomba first starts up (standby)
        # monitor wheel encoders
        # if wheels start moving, switch to case 2
    case 2: # When user initiates cleaning
        # monitor wheel encoders
        # if wheels stop moving for >1 second
            # read distance data
            # if distance == close
                # send clean command
                # while distance == close
                    # read distance data
                # send stop command
        # switch back to case 1
}
Talking to Roomba:
Since we’re gonna need to get sensor info from the Roomba we should probably figure out how to do that. If you skimmed the Open Interface (OI) document I linked above you’ve seen that you can request data packets from the Roomba for any or all of its sensors. This is where I ran into some difficulties… I’m a mechanical engineer and even though I’ve written code for robotics, parsing data packets from unfamiliar hardware is not my strong suit. Unfortunately it’s the only way to get this to work the way we like, so I poured a stiff drink and dove in… also the people over at iRobot were helpful in answering some questions.
Embedding the System:
At his point all the components; an jumble of jumpers, an excessive micro controller, and an oversized breadboard are all just sitting on top of the Roomba. That ain’t gonna fly so we need to start downsizing our components and find a way to embed what we can into the body of the robot. As you could guess this is another challenge, this little robot is absolutely packed with sensors, a big motherboard, battery, motors, and of course a vacuum cleaner. The wires running from the DIN to the Teensy can be carefully soldered right to the board. After that I did my best to cram everything inside and seal the Roomba back up making sure that there are still jumpers running out for the sensor. I unfortunately didn’t think to take any pictures before closing it up, but if you’re interested in what goes into one of these robots there are teardown videos you can check out. This video does a decent job explaining where the components are located (this is specifically the Roomba 880 but is more or less the same across the series):
Final Product:
Maybe not the cleanest, but definitely a tidier look than the the early prototype with the massive breadboard. Having an ultrasonic just taped to the top of the Roomba is a bit janky so I plan on designing a housing for it that will relieve the eyesore. There’s still room for improvement but for now (after a good amount of debugging) it works.